
WITTNER® SHOULDER REST
MADE IN GERMANY
INSTRUCTION MANUAL
WITTNER® Shoulder Rest Isny
Short Assembly Instructions
If you don't follow the manufacturer's assembly and user instructions, then an eventual repair can't be recognized as a guarantee repair.
We assume no liability for damage to your instrument.
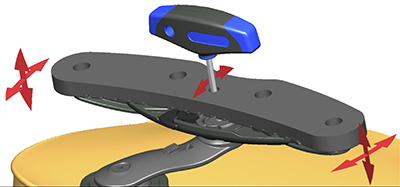
Version A: without chin rest
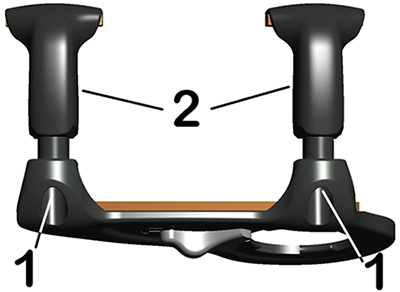
First mount the adjustment clamps (2) onto the base plate.
Insert a Phillips screw into each hole (1) and tighten, turning approximately 3 times. Use a Phillips screwdriver.
Adjust the screws so that they are slightly above the outer rim of your instrument.
Now set the whole unit, loosely centered, onto the instrument.
Finally, tighten the screws gradually, alternating first one, then the other, several times, until the base plate is securely attached to the instrument.
Version B: with WITTNER® center chin rest
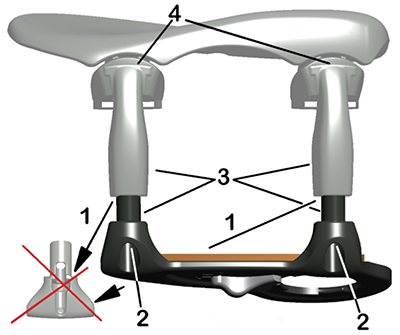
Remove the two clamps (1) of the WITTNER® chin rest. In their place, loosely screw together the base plate of the WITTNER® Shoulder Rest "Isny" with the fastening elements (3).
Insert a Phillips screw into each hole (2) and tighten them, turning approximately 3 times. Use a Phillips screwdriver.
Fit the fastening elements (4) into the underpart of the WITTNER® chin rest.
Set the whole unit, loosely centered, onto the instrument. Adjust the screws so that they are slightly above the outer rim of your instrument.
Finally, tighten the screws gradually, alternating left and right several times, until the WITTNER® chin rest and base plate are securely attached to the instrument.
Version C: with WITTNER® side chin rest

First remove the chin rest from the instrument!
Remove the right clamp (1) from the WITTNER® chin rest. In its place, loosely screw together the base plate (2) of the WITTNER® Shoulder Rest "Isny" with the fastening elements (4 and 3).
Use a Phillips screwdriver. Insert a Phillips screw into each hole (2) and tighten them, turning approximately 3 times. Fit the fastening elements into the underpart of the chin rest (5).
Place the base, loosely centered, onto the instrument.
Adjust the screws so that they are slightly above the rim of your instrument.
Finally, tighten all 3 screws gradually, alternating among the 3 several times, until the WITTNER® chin rest and base plate are securely attached to the instrument.
Versions D and E: with a traditional chin rest (side or center)
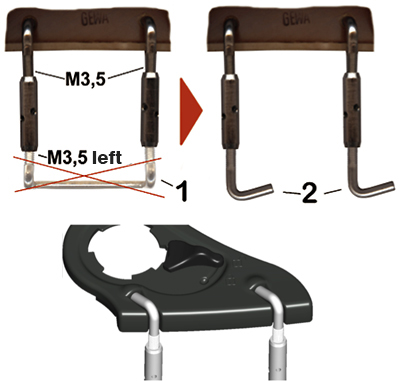
Remove the chin rest from the instrument, then remove the lever (1) and replace it with the 2 enclosed small clasps (2).
Tighten the barrels with 3 turns. You will need barrels with a M 3.5 thread for the assembly. If yours don't fit, you can find them at a specialist supplier.
Then fit the base of the WITTNER® Shoulder Rest into the new clasps. The barrels should be slightly higher than the rim of your instrument.
Finally, place the whole unit onto the instrument and tighten the barrels until the unit sits securely without moving.
Attention: Don't tighten the barrels too much in order not to damage the instrument!
From this point on, the assembly is the same for all versions!
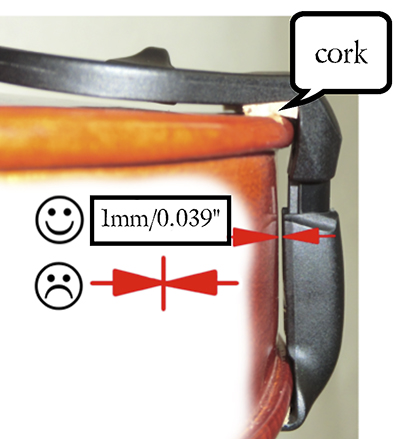
For the assembly onto the instrument, pay attention that the distance between the fastening element and the rim is about 1 mm/0.039".
Tighten the screws only to the point where the whole unit can't be moved.
Attention! Too much pressure could damage your instrument! The base plate should never touch the bottom of the instrument.
The ideal distance between the base plate and bottom of the instrument is approximately 1.5 mm/0.059".
If necessary, you can increase the distance by laying a piece of cork under the base plate, or by cutting a thicker piece of cork to the correct size.
This WITTNER® Shoulder Rest isn't apt to be used with extremely arched instruments!
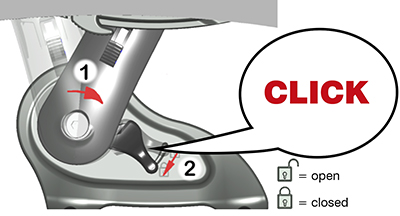
Insert the shoulder rest arm into the specially prepared opening on the base plate, turn the arm lightly to the right (1), and close it with the small lever (2).
To remove the WITTNER® Shoulder Rest, reverse the previous steps.
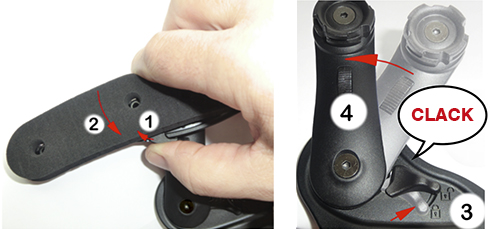
Open the small lever (3), turn the shoulder rest arm to the left (4), and lift it out of the base plate.
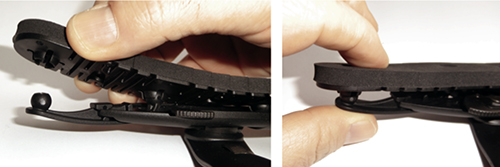
If needed, you can open the second clasp (1) on the pad rest by turning it clockwise.
Separate the shoulder rest arm from the pad rest by turning the pad rest counterclockwise (2) and lifting it.
Then you have the smallest volume of the WITTNER® Shoulder Rest "Isny" and can easily store it in the enclosed cloth bag.
Please remove the shoulder rest arm every time you put your instrument into its case.
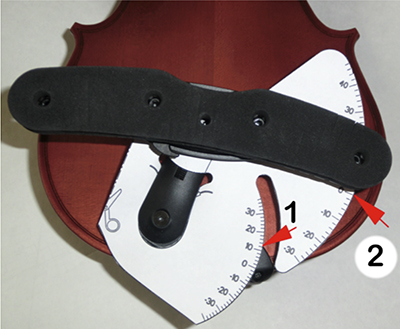
You can make small adjustments for the perfect fit of the WITTNER® Shoulder Rest with the enclosed template.
Put the template onto the base plate as shown in the illustration, mark the values shown on the axles (1 and 2), and adjust the setting of the WITTNER® Shoulder Rest by millimeters, until you reach the optimal comfortable position for you.
Once the WITTNER® Shoulder Rest is fixed, you never need to re-adjust it, it can't fall off while playing, is extra-light and antiallergic.
Because it doesn't touch the body of the instrument like other shoulder rests, your instrument will sound freer!
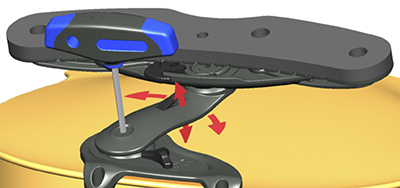
With the enclosed Allen key, open the lower ball joint of the shoulder rest arm.
Then you can individually adjust the position of the shoulder rest arm.
Attention! Don't tighten the screw too much, to avoid damaging the joint!
Through the central hole in the pad, you can reach the second ball joint with the Allen key, and can adjust it according to your wishes as well.
You can remove the pad to make it easier to reach the screw. Simply take the pad off the balls on each end of the arm.
Attention! Don't tighten the screw too much either, to avoid damage! It doesn't affect the sound of the instrument if the gel ball of the shoulder rest arm touches the bottom of the instrument.
A permanent touch with too much pressure can however leave traces on the instrument.
If needed, the pad can be removed from the 4 balls and cleaned with running water.
Let dry completely!
After drying, click the pad onto the balls.
Replacement pads come in 3 different thicknesses – 4 mm/0.157", 6 mm/0.236" and 8 mm/0.315".
The shoulder rest comes with a 6 mm/0.236" pad.
>>> For further information, please watch our assembly video <<<
<<< To the top
<<< Back to product overview
Wittner – Division of Gewa Music GmbH
D-88316 Isny Phone ++49-7562-7040
SITE NOTICE · DATA PROTECTION