
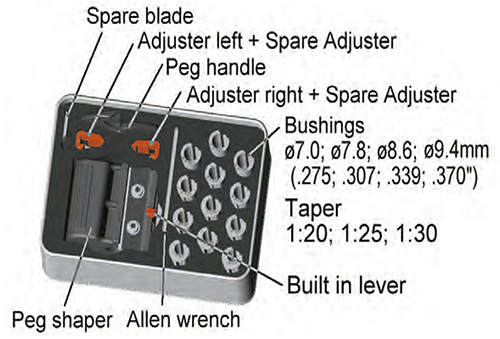
WITTNER® PEG SHAPER
MADE IN GERMANY
INSTRUCTION MANUAL
Before using your new WITTNER® Peg Shaper please read the following instructions carefully to achieve its optimum performance and to avoid injuries.
There is a danger of injury when changing the blade or changing the bushings.
USING THE WITTNER® PEG SHAPER
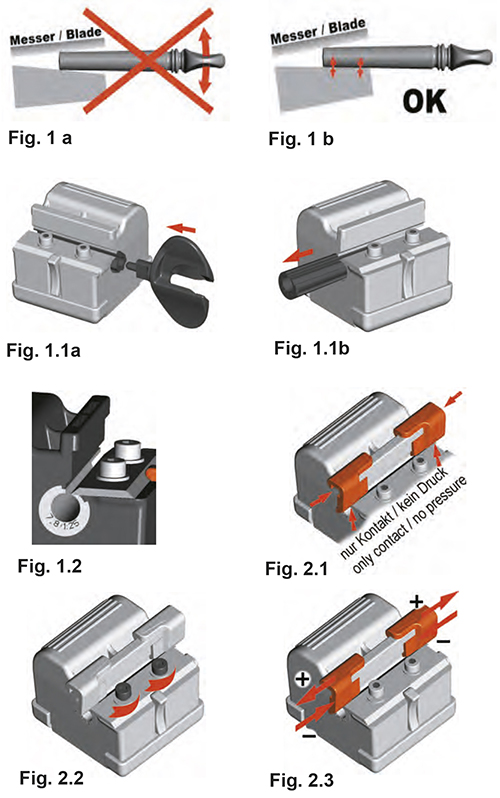
Please make sure to guide the peg as indicated in Fig. 1b.
You can choose between different shaft diameters as well as different tapers by simply exchanging the bushing of your WITTNER® Peg Shaper.
The blade of the WITTNER® Peg Shaper and thus the thickness of the shavings can easily be adjusted with the help of the 2 orange adjusters.
Ideally the shavings should be 0.03 mm (.001”) thick. The adjusters mark the current position of the blade.
1 CHANGING THE BUSHING
1.1 Use the enclosed peg-handle to push the bushing out of the body of the WITTNER® Peg Shaper. Push from the thinner end of the bushing (Fig. 1.1a + 1.1b)
1.2 Insert the required bushing into the body lining up the slot of the bushing with the slot of the WITTNER® Peg Shaper. (Fig. 1.2)
2 ADJUSTING AND CHANGING THE BLADE
2.1 If the shaving is too thick:
2.1.1 Insert both orange adjusters into the WITTNER® Peg Shaper as shown in fig. 2.1 and move them inwards until they touch the blade without pressure
Helpful hint: Once you have found your ideal blade adjustment mark the position of the two adjusters with a pencil on the body of the WITTNER® Peg Shaper.
2.1.2 Loosen both screws with the enclosed Allen wrench so the blade can be moved (Fig. 2.2)
2.1.3 Move the 2 adjusters a little closer together. Make sure you move each of them the same distance.
[For example: if you want the shaving to be thinner by 0.01 mm (.0004”) you need to move each adjuster about 2 mm (3/32”) towards the center] (Fig. 2.3)
2.1.4 Push the blade towards the adjusters using the built in lever and tighten both screws (Fig. 2.4)
2.1.5 Before using the WITTNER® Peg Shaper you have to remove the two adjusters (Fig. 2.5)
2.2 If the shaving is too thin or there is no shaving at all:
2.2.1 Insert both orange adjusters into the peg shaper as shown in fig. 2.1 and move them inwards until they touch the blade without pressure
2.2.2 Loosen both screws with the enclosed Allen wrench so the blade can be moved (Fig. 2.2)
2.2.3 Slide the 2 adjusters a little farther apart. Make sure you move each of them the same distance.
[For example: if you want the shaving to be thicker by 0.01 mm (.0004”) you need to move each adjuster about 2 mm (3/32”) away from the center (Fig 2.3)
2.2.4 Push the blade towards the adjusters using the built in lever and tighten both screws (Fig. 2.4)
2.2.5 Before using the peg shaper you have to remove the two adjusters (Fig. 2.5)
2.3 The shaving is too thick or too thin on one side:
2.3.1 To precisely adjust the blade so it is set exactly parallel to the taper of the bushing move only one of the two adjusters as described under 2.1 and 2.2
2.4 The Blade is Dull:
2.4.1 Insert both orange adjusters into the peg shaper as shown in fig. 2.1 and move them inwards until they touch the blade without pressure
2.4.2 Loosen the two screws that hold the blade with the enclosed Allen wrench and unscrew them completely (Fig. 2.3)
2.4.3 Option A: Turn the blade by 180 Degree
Option B: Use a fresh blade [remove the edge protector]
Please use only original WITTNER® replacement blades (Order No. 278MS1). Otherwise the precise and safe operation of the WITTNER® Peg Shaper cannot be guaranteed.
2.4.4 Push the blade towards the adjusters using the built in lever and tighten both screws (Fig. 2.4)
2.4.5 Before using the WITTNER® Peg Shaper you have to remove the two adjusters (Fig. 2.5)
3 FITTING PEGS
WITTNER®-Pegs ULTRA can be used and worked on in the same way as all wooden pegs.
Helpful hint: Start with the bushing ø 7.8 mm and the taper of your choice.
3.1 Shaping the WITTNER®-Peg ULTRA
1. Adjust the WITTNER® Peg Shaper so the thickness of the shaving is 0.03 mm (.001”)
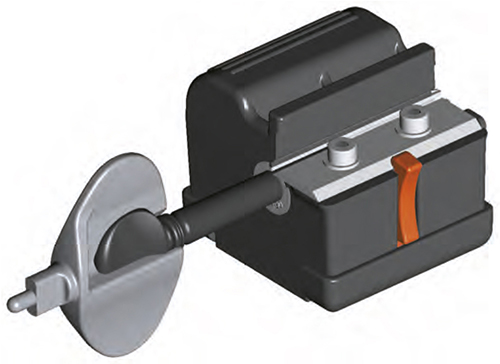
2. Put the peg handle over the head of the peg for more comfortable handling
3. Shape the peg
3.2 Cutting the Peg to Length
1. Cut the peg to the required length with a saw
2. Make a rounded head with a file
3. Finish the head with sandpaper
3.3 Drilling the String Hole
You may drill the string hole into the WITTNER®-Peg ULTRA with any standard drill bit for metal
Patent:
Germany: No. 10 2006 013437
USA: Pending
<<< To the top
<<< Back to product overview
Wittner – Division of Gewa Music GmbH
D-88316 Isny Phone ++49-7562-7040
SITE NOTICE · DATA PROTECTION