
WITTNER® FINETUNE‑PEGS
MADE IN GERMANY
INSTRUCTION MANUAL
WITTNER® FINETUNE-PEGS
Fitting Instructions
The process for fitting WITTNER® Finetune-Pegs is very similar to fitting traditional pegs but there are certain parts of the process that need special attention.
These points are highlighted in the following instructions.
Select the size of WITTNER® Finetune-Peg that is most suitable. Refer to the accompanying leaflet listing dimensions.
In some cases particularly on older instruments it may be necessary to mix sizes. This is not an issue as the pegs are available separately or in sets.
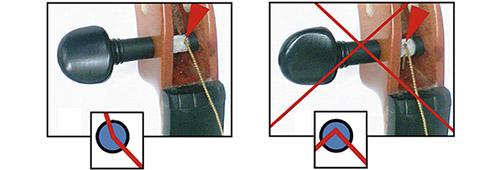
At this point it is worth pointing out that during the fitting process and in the future once fitted the WITTNER® Finetune-Pegs must never be "pulled" by the peg button.
To remove always push the peg out from the shaft end.
It is recommended that one peg at a time is replaced rather than removing all the old pegs at the same time.
This is better for the well being of your instrument as it keeps it under a more constant tension.
For Violin the recommended sequence is A, D, E, G.
For Viola and Cello, D, G, A, C.
Remove the first peg that is to replaced. Then gently slide the replacement WITTNER® Finetune-Peg into the peg box to enable you to judge how much reaming of the peg box is required.
Remove the WITTNER® Finetune-Peg from the peg box by pushing the end of the shaft. Do not pull on the peg button.
At this point before you start to ream the peg box it is most important that the WITTNER® Finetune-Peg is carefully cleaned to remove any peg paste residue that might have adhered to it from the peg box.
It is now necessary to carefully ream the peg box so that when the WITTNER® Finetune-Peg is fitted the central spline of the peg (the part that turns) is flush to the inside edge of the peg box.
Be aware that because the WITTNER® Finetune-Peg is of a composite material it tends to slide further into the peg box
than a wooden peg so during the reaming process it is best to ream a little then slide the peg into the peg box, pushing it in firmly so you can gauge how much more reaming is required.
Don't forget that the peg should be pushed out from the shaft end, not pulled by the button.
The peg is fitted correctly once it is pushed hard into position and the central spline is flush with the inside edge of the peg box.
In fact if the central spline is positioned 0.5 mm inside the wood of the peg box it is most effective.

Once this is positioned properly the peg can be removed and the shaft end carefully cut off with a hack saw.
The end of the peg can than be rounded in the traditional way.
Again at this point make certain that all traces of peg paste have been removed from the peg shaft.
Now replace the string making certain that it winds onto the central spline, the part of the shaft that turns.
This is most important because if the string winds onto the shaft of the peg that does not turn it could "snag" and snap.
In some cases the coloured wound end of the string is too long and there is too much string length to fit on the moving spline.
If this is the case the string can be carefully shortened.
In fact there is no need for more than 3-4 windings of the string on the moving spline.
Repeat this process on the other 3 pegs replacing them in the sequence listed above.
When restringing we recommend you invest in a WITTNER® Finetune-Peg Winder. It makes the process much quicker!
For more information:
>>> WITTNER® Finetune-Peg Winder - Product page

In case none of the available peg-sizes fits correctly or if during the fitting process too much wood is reamed and the
WITTNER® Finetune-Peg slides a little too far into the peg box it is possible to "shim" the peg box using the old “sandpaper trick”.
This is an effective way of increasing the diameter of the WITTNER® Finetune-Pegs.
Here you find different templates to be cut out and inserted into the pegholes:
>>> PDF-DOWNLOAD: Template: How to make a smaller peg fit into a larger peghole without "rebushing"
If you use for example a regular paper of 0,1 mm thickness this causes for example an axial play/clearance of 2 - 3 mm (Taper 1:30; 30 x 0,1 mm = 3 mm).
In order to master bigger tolerances sandpaper (version 1500 or 1800) is used. The grain side should always be towards the pegholes so that the grain side is pressed into the wood.
If you use for example sandpaper, grain 1800 you can kind of "rebush" much wider holes to make our Finetune-Pegs fit very firmly and functional.
This "sandpaper" solution works quite well with our pegs, because the interface surfaces are static.
Points worth noting once again:
Never pull on the WITTNER® Finetune-Peg button. Always push the WITTNER® Finetune-Peg out of the pegbox from the shaft end.
Make certain that no peg paste residue is picked up and left on the shaft of the WITTNER® Finetune-Peg. Always thoroughly clean befor final fitting.
Be aware that the WITTNER® Finetune-Peg is a composite material and will slide further into the wood of the pegbox than a traditional wooden peg.
Take this into consideration when reaming the pegbox. Be very careful not to ream out too far.
The WITTNER® Finetune-Peg must always be firmly pushed into position after final fitting.
It's important to verify that the string has enough room in the grooves of the upper nut to be able to react on the slightest turn of the WITTNER® Finetune-Peg.
Patent:
Germany: DE 10 2007 054 312 A1
USA: USA 7,816,594 B2
China: CN 101868820
and others
<<< To the top
<<< Back to product overview
Wittner – Division of Gewa Music GmbH
D-88316 Isny Phone ++49-7562-7040
SITE NOTICE · DATA PROTECTION